Preparing for installation
Minimum Requirements
The Server
These are the criteria for a machine running the email2GO service.
-
Windows Server 2016 or later
-
PowerShell 5.1 or later (comes automatically with Windows Server 2016 or later)
-
At least 1 virtual CPU is available (not heavily used by other processes)
-
At least 1GB free (unused) RAM on the machine
-
At least 5GB HD available for logs
-
Enough network capacity to manage the reading of emails from email servers and forwarding them to Easit GO.
Administration Clients
-
The administration interface for email2GO is supported on the latest versions of Google Chrome, Mozilla Firefox, Microsoft Edge (chromium).
Preparing values for initial setup
There are 4 values that can be acquired ahead of installation that will make the initial setup of email2GO an easy process. An Easit GO administrator should be able to provide:
-
URL for Easit GO Webservice to the Easit GO instance you wish to forward emails to. (Which usually is the URL for the Easit GO user interface followed by “/webservice”
-
An API Key for the Easit GO instance you wish to forward emails to, with sufficient access rights. Depending on your Easit GO version and your licenses you may or may not have access to “create API -keys” in Easit GO. If needed, you can request access to “create API-Keys” from Easit Support.
To enable the email2GO server to read emails in Office 365 or Gmail accounts, email2GO requires an app registration in respective system. During the app registration, save the following values for use in email2GO:
-
Application ID (Program-ID in Swedish)
-
Client Secret (Klienthemlighet in Swedish)
The app registrations must also have some connected scopes dependent on the server type (Outlook, Gmail or IMAP)
Once you have these values, you will be able to complete the initial setup.
App Registration - Microsoft Azure
If you are going to use IMAP or Office 365 mailboxes, Microsoft requires an app registration in order to use Microsoft Graph API.
To complete a working app registration for email2GO, do the following:
• Add web under authentication, with redirect URL matching: https://hostname:[port]/auth
• Add both Access token and ID token in the implicit grant section under “authentication”
• Add Microsoft Graph under API permissions with the following access rights:
For Outlook Office 365 Azure the following scopes are required:
Mail.ReadWrite, Mail.Send, offline_access, openid, profile, User.Read, Mail.ReadWrite.Shared,
For Outlook using IMAP only the following scopes are required:
https://outlook.office.com/SMTP.Send, https://outlook.office.com/IMAP.AccessAsUser.All, offline_access, openid, profile
• Add a client Secret under “Certificates and Secrets”
Below follows a more detailed description of the necessary steps.
Step-by-step App Registration in Azure
Go to portal.azure.com, login with your Office 365 credentials.
Go to App registration
Press + New registration
Give the app registration a name that is easy to remember and understand, e.g. “email2GO”.
Choose Multitenant or Single tenant and set the redirect URL.
Remember what you picked here; it will be used for email2GO settings later. If you are unsure or just want it to be like in email2GO 1.X, choose Multitenant.
The redirect URL should be Web and https://hostname/auth if you are using port 443, and https://hostname:port/auth if you are using a different port than 443.
The hostname should be the local name of the server you are going to install email2GO on.

When you are done, press Register
The “Application (client) ID” that can now be seen will be used by email2GO.
Go to Authentication and check both Access tokens and ID tokens in the Implicit grant section.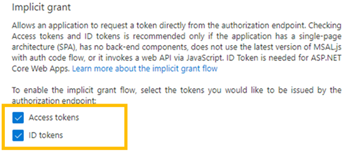
The next step is to allow the application to access Microsoft Graph API. Select API permissions and Add permission. Select the Microsoft APIs tab (if not already selected) and choose Microsoft Graph.
Select delegated permissions and add the rights showing in the picture below. You might need to scroll down a bit to find the ones starting with Mail.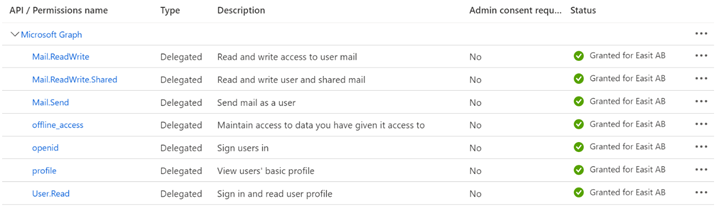
These settings are important. It allows email2GO to perform the necessary API calls in Microsoft Graph.
If you are upgrading from email2GO version 1.x it is important to add the permission Mail.ReadWrite.Shared and verify that permissions are granted by your IT administrator before upgrading email2GO to version 2. This enables the usage of shared folders.
For the final step, go to Certificates & secrets and click New client secret.
Once created, it is important that the secret is saved in a safe place because this is the only time when it will be shown in plain text. You can copy the secret to the clipboard by clicking on the icon shown in the picture below. This secret is used when creating a new server in email2GO.
Make sure to save the client secret value, not the client secret ID.
Registration complete.
App Registration - Gmail
If you are using Google, the server you install email2GO on must have a valid public mozilvel domain name (such as .com or .org), see InternetDomainNameExplained · google/guava Wiki · GitHub.
The following instructions also assumes that you already have a Google Workspace account configured which is needed to run the application as internal.
For the email2GO server to be able to read emails in from Gmail, Google requires an app registration in your already configured Google Workspace account.
The registration can be done here: Google API Console
During the app registration, save the following values for use in email2GO:
-
Client ID
-
Client Secret
To complete a working app registration for easit2GO, do the following:
-
Create a project associated with email2GO
-
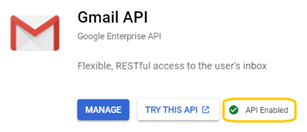
Enable Gmail API
-
Create an OAuth client ID
-
Select “web application” under “credentials”, with redirect URL matching: https://hostname.xx.se:[port]/auth
-
Create OAuth consent screen
-
Add scopes to the account.
Below follows a more detailed description of the necessary steps.
Step-by-step App Registration in Gmail
-
Open the Google Developers' Console
-
Login with the Google account admin associated with Google Workspace account.
-
Create a new project by pressing on the drop-down arrow close to the top left corner.
-
Enter a Project name of your choosing.
-
Select Organization and Location of your choosing and click Create.
-
If you have not already enabled the Gmail API you will be working with, you can do so by clicking on Library in the left-hand navigation pane, select Gmail API and Enable API.
-
Go back to your project and go to OAuth consent screen in the left-hand navigation pane.
-
Select User Type internal
-
Press CREATE
-
Enter App information for the OAuth consent screen.
-
App domain and Authorized domains is up to the customer to fill in relevant information suitable for the organization.
-
Press save and continue.
-
The next step is to allow the application to access Gmail.
Add the following scopes:
openid, https://www.googleapis.com/auth/userinfo.email, https://www.googleapis.com/auth/gmail.readonly, https://www.googleapis.com/auth/gmail.modify, https://www.googleapis.com/auth/gmail.send -
Press save and continue.
-
Click on Credentials and then + Create Credentials and select OAuth client ID.
-
Select application type (Web application)
-
Give the registration a name that is easy to remember and understand, e.g., “email2GOProduction”.
-
The redirect URL should be https://hostname.xxx.se/auth if you are using port 443, and https://hostname.xx.se:port/auth if you are using a different port than 443. The hostname should be the local name of the server you are going to install email2GO on.
(The server you install email2GO on must have a valid public top-level domain name (such as .com or .org), see
InternetDomainNameExplained · google/guava Wiki · GitHub.)
Internal network domains like hostname.xx.lan or just the hostname is not accepted by google. -
Save Client ID and Your Client Secret. Once created, it is important that you save the secret by copying it to the clipboard. Save the secret in a safe place. Client ID and Your Client Secret are used when creating a new server in email2GO. You should also use the same redirect URI you entered in google (https://hostname.com:8443/auth) in email2GO. The URI is entered in email2GO -> general settings and the field “URL to email2GO”.
-
Registration is complete.
Preparing migrating from EmailRequest
EmailRequest configuration file
If you are migrating a folder from EmailRequest, there are a few values you can obtain from the EmailRequest configuration to make the migration smoother.
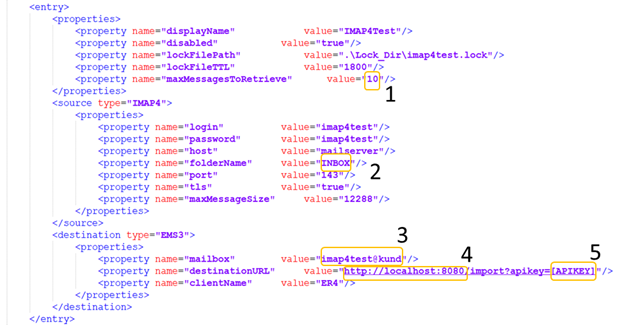
1) This value goes to “Mail per transfer” in the Folder settings
2) This is the name of the folder that you choose from the drop down when you create a folder in email2GO.
3) This is the Import handler “Identifier” that should be specified in the Folder settings.
4) This is the base URL for the Easit GO user interface, which usually can be used for the “URL to Easit GO webservice” in General Settings. Please remember to add “/webservice” at the end. See the field description for details.
5) This API key can used to populate the “API key to Easit GO”-field in General Settings
Please note that when using IMAP4 in EmailRequest, EmailRequest will keep processed emails in a “read” status in the original folder. Before you connect an account and a folder in email2GO, you need to consider the state of the emails currently in the folder. Emails in “read” status is considered to have failed processing by email2GO. If you have emails in “read” status that should not be processed, make sure to archive them before connecting the folder to email2GO. Otherwise you risk resending them by accident in the email2GO user interface.
Switch from EmailRequest to email2GO
In the EmailRequest configuration file, deactivate the section that corresponds to the account you wish to migrate to email2GO. This is easily done with XML-type comments. One migration has been completed and verified, remove the deactivated section.
Microsoft Graph and email aliases
Reading emails with low level protocols like POP3 and IMAP differs a bit from how Microsoft Graph works. With POP3 and IMAP the message is read unparsed with email addresses kept the way they were written by the sender. With Microsoft Graph the message is parsed and the email-addresses accounts are looked up, when possible.
Any email alias provided by the sender in the fields “from”, “to”, “cc” or “bcc” will be replaced with main email address for that account, for the email addresses can be looked up as a local account.
Be aware of this change if you move from EmailRequest and currently rely on email aliases.