Installation
Using the Installer
The email2GO server is installed by using the provided install package.
During the initial steps of the installation, you will be prompted a few simple questions. Files will then be copied and adjusted for you and the Windows service will be automatically installed and started.
Three important parameters are explained below, take the time to read about them.
Host
The host parameter is about how the email2GO server should be accessed. By default, the local server name is selected. This is normally fine for access from inside the same network. If you wish to access email2GO from inside your network, the prefilled value is normally the correct value.
If you wish for the server to be accessible for another network, it might have a different name from that network. Contact network responsible for guidance if you are uncertain.
Port
Standard port for HTTPS is 443 but for email2GO we have chosen the port 8443 as default to avoid servers trying to listen on the same port. If port 8443 is already used at this machine or if you wish to use another port for another reason, you should specify that in this field.
Add Certificate
At one point of the installation, you will have the option install the server certificate into the trusted root CA (Certificate Authority) store in Windows. You can continue without performing this option, but the browser will not trust the connection to the email2GO server until a server certificate is in place.
Install certificate in trusted root store
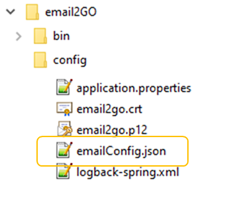
By default, the email2GO server certificate is located in the <INSTALLDIR>\config (C:\Program Files (x86)\email2GO ).
Download the email2GO.crt file to the client you wish to run the email2GO user interface on.
Run the email2GO.crt certificate, on that client, and add the certificate to the trusted root certificate store.
Upgrade/Patch existing installation
There are two ways to update an existing installation of email2GO.
• Changing war-file in directory
• Removing old version and installing new using installer
Changing war-file in directory
Start with turning off the existing email2GO service.
Default name in windows services is Easit email2GO
By default, the email2GO files is in C:\Program Files (x86)\email2GO .
We recommend to always take a backup of the file emailConfig.json before modifying the program. Can be found under <INSTALLDIR>\config.
To update email2GO, simply replace email2go.war file in <INSTALLDIR>\bin with the new provided one. Make sure the new file has the exact same name as the previous one had.
Now, simply start the windows service once more. The version number can be seen at the login-page for email2GO.
Windows-tools like Add or remove programs will not update the displayed version number if the war-file is swapped. The true version can always be found at the bottom of email2GOs login page.
Removing old version and installing new using installer
First stop the email2GO service.
Then use Window Add or remove programs to uninstall email2GO and then follow the instructions for Using the installer.
The configuration and logs will not be removed by uninstalling the program.
Creating p12-file and certificate
The email2GO server only supports administration via the HTTPS protocol. To operate in secure mode, the server requires PKCS#12 (p12) file with a private key and a certificate.
You can either create a p12-file within your company’s existing PKI-infrastructure, or you can create a p12-file using the provided tool.
The installation program automatically generates a p12-file using the provided tool. The provided tool creates a p12-file that contains a private key and a self-signed certificate dedicated for server authentication of the email2GO server that works with common browsers on Windows and MacOS.
If you wish to generate the p12-file without using the automated procedure in the installation, you need to alter these application.properties, before starting email2GO:
o server.ssl.key-store=config/customer_certificate_name.p12
o server.ssl.key-store-password= customer_certificate_password
If you are unsure about the security implications of the different options, please contact your Security Officer for guidance.
Using the p12generator.jar
If you for any reason need to generate a p12-file manually with the provided tool, here is how:
Open a command prompt at <INSTALLDIR>\bin and type java -jar p12generator.jar
A message is displayed on usage and the required parameters.
The parameter for Host name is important. It should be the fully qualified name for the host where email2GO will be running. It will be stored in the certificate as Common Name and matched with the provided URL in all calls to the email2GO server.
Example: If the URL for accessing email2GO are https://somehost.mycompany.lan:8443 then the host parameter should be somehost.mycompany.lan.
The password parameter should be provided in clear text format. This is the same value you should enter in the application.properties file. When the server starts, the password will automatically be encrypted in the application.properties file.
The p12generator.jar will produce two files to the target directory if successful, email2go.p12 and email2go.crt.
The installation program will put these files in the <INSTALLDIR>\config folder.
To get browsers to trust the server add the email2go.crt to the trusted store of the client computers that should administrate email2GO.
Configure server
It is possible to change some email2GO settings after installing. These settings can be found in application.properties and logback-spring.xml in <INSTALLDIR>\config (C:\Program Files (x86)\email2GO).
Server related settings can be changed in application.properties. Settings like port number, SSL-key and config paths.
In logback-spring.xml it is possible to control several logging related settings.
Initial setup
Once the software has been installed, there are a few initial configurations to be made inside the administrative user interface.
Create an administration account
When you first start the user interface you are required to register an administration account in the application. This is an account for accessing the user interface on the email2GO server.
Only one administration account is supported in this version.
General Settings
Once you have created an administration account, go to General settings, and fill in the required fields. The fields are explained below.
API key to Easit GO
An API-key is a token with access right connected to it. Paste the Easit GO API keyfor the Easit GO system in this field. The API keys can be created in Easit GO by administrators. Contact Easit Support if you lack this option as an Easit GO administrator.
URL to Easit GO webservice
Enter the base URL for the Easit GO Webservice API in this field, which normally is the URL for the Easit GO user interface followed by “/webservice”.
URL to Email2GO
This field should hold the redirect URL to the email2GO server that Microsoft/Google uses to redirect their answer to. Normally the URL for the email2GO server followed by “/auth”.
Done! Go to Usage to get started with email2GO.