Usage
Overview
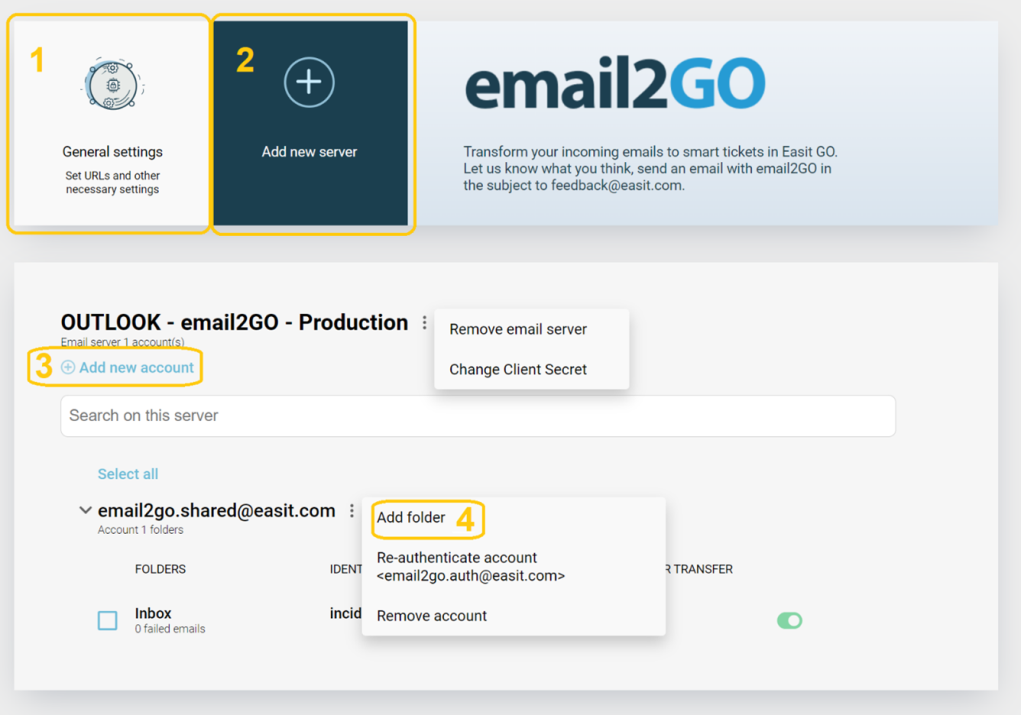
General settings (1)
There are a few things that can be done in the email2GO web-interface. The settings for the connection to an email2GO instance can be controlled under General Settings. When an account exists in the server it is also possible to configure alert emails.
API key to Easit GO, URL to Easit GO webservice, URL to Email2GO
These are settings that normally only is alterered during Initial setup.
Use this account to send the message
The email2GO server sends alerts when something goes wrong, like emails not being processed properly. Alerts are sent via mail, and here you choose from which account these alert emails should be sent.
You need to set up at least one email account to be able to set this field. Come back when later and fill in this value, to get alerts.
Send the message to
Here you should specify the receiver email address of the alert messages from email2GO.
Add new server (2)
Under the button Add new server it is possible to add three different types of mail-servers, Office 365, Gmail and Outlook using IMAP. Tee values for Application ID and Client Secret during App registration in Preparing for installation.
Add new account (3)
Once you have defined a server you can connect accounts to it, use the Add new account button to start the process. You will first be asked to fill in the account name (email address) you wish to get emails from.
An email account must be unique in the whole email2GO instance. The account can have multiple folders but can only be added once in an email2GO instance.
The next step is to authorize email2GO to read emails from that account. Depending on your Azure or Gmail settings, different mechanisms for authenticating the account may now appear.
Once authenticated, a security token will be returned to email2GO so that email2GO can read emails from that account.
Depending on the Azure settings in your domain, an approval process might be invoked the first time you are adding an Office 365 account. The domain administrator will then receive an authorization request for email2GO to get access to the Microsoft Graph API. Once the administrator has approved this request, you can continue to add the account.
Add folder (4)
The next step is to add a folder that will be read from the account. This can be achieved by pressing Add folder and configure the following settings:
• Folder: chose an existing folder on the email account in the drop down. This folder is the one being scanned for new emails.
• Identifier: The ImportHandler identifier in Easit GO. Ask your Easit GO administrator for guidance if you are uncertain. If you are migrating from EmailRequest, the identifier is specified in the configuration file for EmailRequest.
• Mail per transfer: The maximum number of emails that should be processed, each time the folder is scanned.
• Schedule (Optional): How often email2GO should check for new emails.
• Exceptions (Optional): Cancel scanning for emails at certain times each day. This can be useful to avoid errors during scheduled maintenance breaks, etc.
Miscellaneous features
Remove an account
If an account should not be used anymore, you can remove it.
Only configuration on the email2GO server side is removed. The actual email account and its folders, on the email server, are unchanged.
Reauthenticate an account
If an email account cannot be accessed from email2GO, it will show up red in the user interface. To solve that problem, “reauthenticate” the account.
If it still does not work, check if the client secret has expired and make sure no changes have been made to the app registration. The client secret can be changed by pressing Change client secret.
Edit folder
Hover over the folder you want to edit and click the configuration button to right. Look at the section Add Folder above for a detailed description of each field.
Remove folder
Hover over the folder you want to remove and click the remove button to right.
Only configuration on the email2GO server side is removed. The actual email account and its folders, on the email server, are unchanged.
Suspend email scanning of a folder
By default, new folders are “active”. This is visualized with a slide bar on the folder that is On. You can slide that to Off to suspend email scanning of that folder and keep the configuration.
Slide back to On when the folder is ready to be scanned again.
Multi operations
You have the option to select multiple folders. When you do that, the Multi-edit and the Multi-remove buttons appear on top of the accounts list.
All values (except identifier) for all selected folders are affected of a multi-edit and is set to what is displayed on screen.
Alerts
Email2GO can send email2 in case there is a failure processing a mail. This can be configured under General settings when an account has been added. This is not required but a yellow warning will appear on the General settings button if it’s not configured.
Add a shared mailbox
Ensure access to mailbox/folder
First make sure you have an account that have full access to the mailbox or folders you wish to read from. You are good to go if it is a shared mail like a noreply@work.com that you can add and open as a mailbox in Outlook.
Guides to share an Outlook account can be found online: https://support.microsoft.com/en-us/office/allow-someone-else-to-manage-your-mail-and-calendar-41c40c04-3bd1-4d22-963a-28eafec25926
If you only wish to share a single folder, it can be achieved by right-clicking on the folder and select Permissions/Behörigheter. Press the + to give a single user Owner/Ägare access.
The account that authorizes requires full access (Owner/Ägare) to the mailbox/folders that will be read from.
If you add very granular permission, only to a single folder in a mailbox you must also give permission to the Deleted items-folder (Borttagna objekt in Swedish) for email2GO to work correctly. Otherwise email2GO can’t delete any emails.
Use email2Go to access shared mailboxes/folders
Press Add new account and use the shared mailbox/account you wish to read from like usually in email2GO.
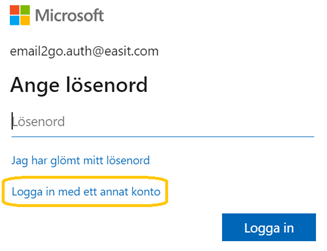
During the authentication to Microsoft/Google select Sign in with another account and use an account that the mailbox/folders are shared with and have full permission.
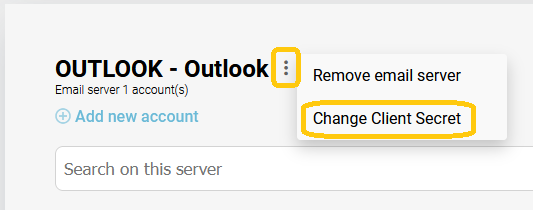
Change client secret
The client secret for the mail server can be changed at any time by clicking the three dots and selecting Change Client Secret.
Please note that the new client secret must belong to the same App Registration as the previous one.
It is recommenced to check if the connection to Azure/Gmail works after changing the ClientSecret.